Tuesday, June 11, 2013

How to Use an eBay Listing Template With Turbo Lister

I use Turbo Lister for all of my eBay listings for several reasons.  One reason is that I can save my listing template in TL and start all of my listings from my template.  I don't have to load it again and again.  Just once and it's done.  If you don't have Turbo Lister on your computer, you can get it free from eBay here.

I have mine already set up, so I don't have screen shots available for how to do that, but it is simple.  TL will ask for your eBay user ID and your password so that it can upload your listings on your behalf.  Once you have that done, you are ready to set up your template to use.

Saving Your New Template In Turbo Lister
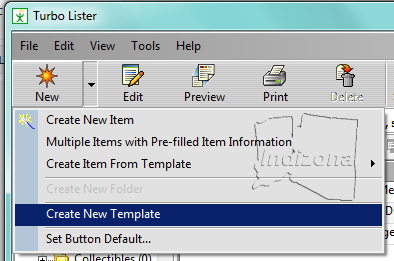


Once you have TL open, click on the arrow for the drop-down menu next to the New button, and choose Create New Template, as shown in this screen shot.  


Give your template a title..... name the template, not a listing title.  You can have several templates saved.  If you list in one category quite often, you can save a copy of your template in that category, and another template in another category.  Let's say you sell a lot of books, you might have templates named "Fiction Books", "Antique Books", etc. or if you sell clothing, you might have templates named "Women's Shirts", "Men's Jeans" and stuff like that.  You can edit your title any time and you can delete and add more templates whenever you want to.

For my instructions, to make things as simple as I can, just name your template Original Template or something so you know that there have been no changes made to it and it is the original template that you started with.


If you sell in a number of categories, don't choose a category.  If you sell in one particular category more often than anything else, you can choose that category and it will be your default category chosen when you go to make a listing, and it can be changed.  

Leave the start price, buy it now price, UPC, condition description, shipping and other information blank.  Only fill in these spaces if those are always the same from one listing to another.  (You can do this later if you make different templates for categories that you sell frequently, as suggested before)

Scroll to see the Description box and click on Description Builder:

Click the HTML View tab.  Open your Notepad document that your listing template is saved in, select all, and then copy the code.  Paste your template code into the box for the HTML view as shown.


Go to the Design View now.
If there is any text in your template that needs to be removed, do that now.  This would be, for example, my terms of sale for the template that you bought from me (or from somebody else).  If it was a pre-made template, the description of the template itself will need to be removed.  You should remove everything except the word Description.  It's a good idea to leave that word there.  (for several reasons that I won't get into right now)

Now you need to add any text that you want to be in every one of your listings.  This could be a message about your listings, your terms of sale, or whatever.  If you sell the same kind of things all of the time, you might put the words Height, Length, Depth, etc. or whatever words you need for every one of your listings and then you just have to fill in the measurements when you go to make a listing.

When you have it set up just like you need it to be, click the save button.
Notice now that your code is in the Description Builder box.
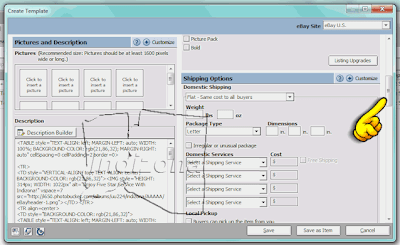
Scroll down now to fill in your handling time, check the Global Shipping Program if you want to use it, Payment methods you accept, your return policy, Additional Instructions, and Buyer Requirements.  Fill in anything that is always the same and leave the things blank that change from one listing to the next. 
Click the save button and now you are ready for your first listing with your new template. Do NOT click "save as item".  Just click save.

Making Your Listing From Turbo Lister
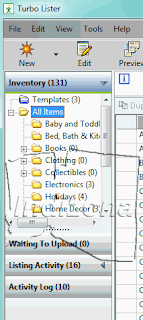
If you are already using Turbo Lister, then you have probably set up folders for your inventory.  If this is your first time using TL, you will want to set up folders to keep track of your items and make them easier to find if you sell in more than one category.  I sell in a wide variety of categories, and I have several folders already set up in mine.  You don't have to think of every folder you ever will need right now because you can add folders and sub-folders any time you need to.  

To add folders, click on the All Items folder so that you will add folders to that folder.  Then click the arrow next to the New button and choose Create New Folder.  If you want to add sub-folders to a folder, click on the folder that you want to add folders to in order to add folders to it.


After you have at least one folder set up, you are ready for your first listing.  Click the New button (or the arrow) and then choose Create Item From Template and then choose your template.  As you can see from my screen shot, I currently have 3 templates in mine and I want to use the first one.  If you have more than one template, make sure you have them named so that you will not get confused about which one to use.  
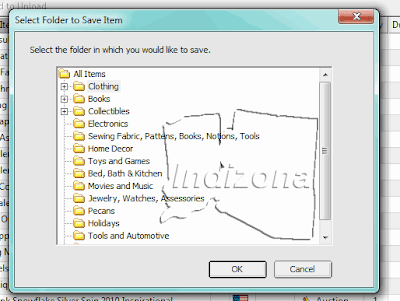
Next you will select a folder to save your item in.  This is why you need to set up some folders first. 
Now you will give your item a title, fill in the price, select your category, add photos, and fill in everything that was left blank in the template.  Click on the Description Builder button and write your description in the place in your template where the description goes.  If you ever mess anything up, you can click the undo arrow.  If you ever lose the color of your font, you can get the color code from me and change it back.  See the next screen shot:

After you are done with your description, click save.  You can also add your photos from this page, or you can add them from the first page, it doesn't matter.  Sometimes it's faster from the item description page.  Try both ways and see how you prefer to do it.

Once you have all of your item details complete, click the save button.  If you have forgotten anything that is required, you will be reminded of it.

Now you need to upload your item to eBay.  Go ahead and upload your first one so that you can see how the process works.  Click Add To Upload, and then choose Go Upload now if this is the first time you have ever used Turbo Lister.  The next time you can choose Return to Inventory and continue to add more items, each time adding them to your upload and when you are ready, click on Waiting to Upload from the left side, as seen in the next screen shot.

As you can see, there is a Duplicate button too so that if you have another item that is either the same or very close to the same, you can duplicate any of your items and then edit the title, description, and other things wherever you need to.


Now let's upload that Item.... Click the arrow next to the Upload All button to see that you can either Upload All or Upload Selected if you have a list of items but only want to select some for the current upload and wait to upload the rest.  There is also a choice to Upload to Selling Manage, but I don't use Selling Manager, so I cannot tell you anything about that.

You can click on Calculate Fees first if you need to see what your fees will be, but it will also tell you the fees before you confirm to upload.  If you get any discounts, or free listings, it will not show as discounted or free until after the upload is complete.  That's why I said if this is your first time to upload just one to see how it works.


That is it.  I've told you enough to get you started.  I have not explained every button or everything you can do with Turbo Lister.  You just need to click on things and see what they are and read the Turbo Lister Tips from the Help Menu.

You will want to keep your TL backed up, and it will basically tell you when to check for updates and do your backup.  You will also need to keep your Activity Log and your Listing Activity cleared out so it won't get full and slow your TL down.  Also, I never ever synchronize mine because I did it one time and it got messed up and kept crashing and I ended up having to uninstall it and install it again.  If your inventory gets close to a couple hundred items, you should delete a bunch of the items that you have sold if they were one of a kind, just to keep it from getting slowed down, or at least that's what I read in a blog somewhere.

Let me know if I can design any graphics for you or a listing template.   Click the Contact Member link on the left side under my avatar on eBay, or click the Contact Seller link on the left side of my Bonanza booth, or use the Contact Me link on my Addoway profile page.

Thank you for reading my blog.  Share it with your friends if you know somebody who can use the help.


Friday, June 7, 2013

Using a Listing Template for eBay Listings.... How to Use Your eBay Template From the Sell Page on eBay

Whether you came here because I gave you the link to show you how to use the eBay template that I made for you, or if you found my page after searching online for help to use a template that you bought from somebody else, thank you for coming.  I will be glad to help you to use your eBay Listing Template. 

If you don't have a listing template, but are thinking of getting one and just want to see how to use one first, please consider allowing me to design one for you.  My prices are reasonable and my customers are satisfied with my work.  You can contact me through my Facebook page and I will answer as soon as I see your message.  Just click the Message button on the right side, under the banner. 

If you don't want to contact me through Facebook, you may contact me through any of my profile pages where I sell online.  Click the Contact Member link on the left side under my avatar on eBay, or click the Contact Seller link on the left side of my Bonanza booth, or use the Contact Me link on my Addoway profile page.

Saving Your Template

If you buy a template that I make, I will send it to you as an email attachment in the form of a Notepad text document.  Save it in your documents in a file where you can easily find it and never make any changes to the original document that I send to you.  If you make any changes to your template, by adding boilerplate (policies and such) to it, you will need to save it with a new name so that you will always have the original template in case you ever need to go back to it.  Do not ever try to save it as a Word or other type of document.  It needs to remain a Notepad document.
I also keep a copy of my templates saved on my desktop so that I don't have to ever open the ones that I have saved in my documents.  You can do this too and that way they are handy to get to in a hurry.

If you need any help with downloading your template and saving it to your computer, I have screen shots of the process on my blog for using a template on Addoway.

Putting Your Template Into a New Listing on eBay

I'm writing this with the assumption that you already know how to list an item on eBay, so I will skip the process of finding your category, giving your listing a title, uploading photos, and all of the rest.  I will only be concentrating on putting your template into a listing and adding your description and policies to the template.

When you get to the Describe the item you're selling window, click on the HTML tab.


Open your Notepad template document if you don't have it open already.  Right click, select all, right click, and copy the code.  Right-Click at the beginning of the HTML edit window in your eBay listing and paste your code into the editor.  Now you can click on the Standard tab to see your template and write your description.


Find the place where I wrote that your description goes and just left click at the end of the phrase and drag your mouse over it to the beginning to select it and just start writing over it.  This will keep the font the same and keep it the same color and size for you.

If you have policy information that you need to add to your template, do it now.  Write your policies or anything else that you want to be in every listing that you make.  When you have everything added that you want to add you need to save your template again with a new file name so that you won't have to add it again.  Do this before you write any description.  
  1. Write your policies and any other information that you want included in every listing
  2. Click the HTML tab again
  3. Select the entire code and copy it and paste it into a NEW Notepad document
  4. Save your edited template with a NEW NAME so that you will not overwrite the original template that I sent to you.
  5. Use your revised template now for your listings.

Adding Your Template to an Existing Listing

You will need to revise your listings one at a time in order to add your template to them.  Once you have clicked to revise your listing, go to the Describe the item you're selling edit window, just like when you are putting it into a new listing, and click the HTML tab. 


You will see the code for your description.  Place your cursor at the very beginning of the code and press enter on your keyboard 3 times to make 3 lines of blank space.


Copy your template code from your Notepad document and paste it at the top of the HTML edit window and then click the Standard button to return to the regular view.


Scroll to find your item description below your template.  Left click and hold while moving your mouse over all of your description to highlight (select) it.  Right click and cut your description.  Now scroll up to find where it goes in your template.  Hold the left click button while you move your mouse over the phrase where your description starts and then  right click and paste your description over it.  Depending on your browser, it might not keep the font and size and color for you, but you can change your font and the size and the color with the editor buttons, just like you can when you are making a listing without a template.
I use Turbo Lister, which is free from eBay, to keep my template in.  That way I do not have to paste it into every listing that I make.  I just start a new listing from my template and it's so easy.  I wrote another blog post about using Turbo Lister with templates and you can see it here.

Let me know if I can design any graphics for you or a listing template.   Click the Contact Member link on the left side under my avatar on eBay, or click the Contact Seller link on the left side of my Bonanza booth, or use the Contact Me link on my Addoway profile page.

Thank you for reading my blog.  Share it with your friends if you know somebody who can use the help.

Thursday, April 12, 2012

Print Your Custom Business Cards Online - How To Upload And Align

I can design your custom business cards for you and send the PDF file to you so that you can upload them to your favorite printing site to have them printed any time you want and sent to you.  The screen shots I have taken are from Vistaprint.com, but you do the same thing when uploading to Office Depot or Staples.  I didn't check any other web site, but I imagine that it is either the same procedure, or close to it.

From the Vistaprint home page, choose Personal Business Cards.


Next you will choose to Upload A Complete Design.


Now you will browse for your file and upload it from your computer.  I didn't make screen shots of the browse process because the files on my computer aren't the same as your files.  Just find the folder where you saved your business card PDF and click "open" when you find it.

Now that you have uploaded your card, click on "Crop This Image".

Click "Scale To Fit" and then click OK.  Do not worry that it looks a little blurry.  The image on the screen is a lot larger than actual size, and it will not be blurry when it is printed at actual size.


Click next.

If your card is centered correctly and inside of the dotted lines, you may continue with your order.  Check the box for "Online Proof Approval" and then click next. Follow the instructions from Vistaprint for placing your order. 

If your card is sitting right up next to the lines, as my example is, then you may want to shrink it down just a little to be sure everything prints.  If it isn't quite centered, you will want to center it.  The next screen shots show you how to do that.

When you hover your mouse over your card, you will see an edit button in the top left corner.  Click on it and then click move/resize from the drop-down menu.


If you need to shrink it just a little, simply move your mouse to a corner until a small line with an arrow on each end appears.  Click on the little arrow and hold it while you move the mouse in toward the center of the card. If you move it in too far, just pull it back out until everything is inside the dotted lines.

Once you have shrunk it just slightly, then you will need to center it.  Hover your mouse over the card and you will see two small arrows with points on both ends that are crossed.  Click and hold while moving your mouse to move the card and center it.

When your card is sized and centered and looks just like you want it to look, check the box for "Online Proof Approval" and then click next.  Follow instructions that follow for placing your order.


If you are needing somebody to design your business cards for you, I will be happy to do it.  You may contact me at any of the following places:
www.Bonanza.com/Indizona
http://www.addoway.com/Indizona/storefront
www.Facebook.com/IndizonaVariety

I look forward to hearing from you.  Have a great day!

Tuesday, April 10, 2012

Make Yourself the Featured Owner of Your Fan Page So Your Friends Can Easily Find It From Your Facebook Profile

If you have you ever tried to find a friend's fan page, then you have probably had to ask your Facebook friend for a link to their fan page.  Do you find yourself wishing that your friends could find your page without having to post a link to your fan page?  Wouldn't it be nice if we could just go to a friend's profile and find the link?  Read on to see how easily it can be done!!

To make it possible for your Facebook friends to find your fan page from your profile, wall, Timeline (whatever you want to call it), all you have to do is make yourself the Featured Owner of your page.  If you have more than one page, make yourself the Featured Owner of every one of your pages and all of the links will then be ready to be found from your profile. (wall, Timeline)

First, go to your fan page and open up your Admin Panel if you have it hidden.  You need to choose the Edit Page link from the Manage drop down menu.


It will open on the Manage Permissions page.  Find the Featured link on the left and click on it and then Edit Featured Page Owners.


Now you are going to choose yourself as a featured page owner and save it.


That's all there is to it.  You are now featured as the owner of your page and your fans can find your profile and your friends can find your fan page because they are linked now.  There is an About link under your banner on your fan page.  This is where your links are to your websites, storefronts, blogs, etc. that you have listed in the website blank on the Basic Information tab.  To have all of your links listed, simply put a space between every one of them and they will all be listed for your fans and friends on your About tab.


Now doesn't that look nice to have yourself listed as the page owner?


Now go back to your wall so you can see how you are featured as a page owner.  I have not switched my profile over to the new Timeline yet, so I made a screen shot of mine so you can see where it is featured on the old style.


I checked several friends who have the new Timeline to see if they are a featured page owner yet and most of them are not, but I did find a couple who have featured themselves as their page owners so I could tell you where to look if you have the new Timeline.  It is in the same place, under your banner, that it is on the new fan page format.  Just click the About tab.


I hope that you have enjoyed my instructional blog today and that you will share with your friends so that they can be featured owners of their fan pages too.

I must admit that I did not learn this on my own either.  I learned about featuring myself as my page owner from one of my Facebook friends, Linda Kelly Lee, in a post that she made in her group a while back.  I just took it one step farther and made screen shots to help those who need the visual help.

I'm looking forward to seeing all of you featured page owners on Facebook.  Please leave your comments, as I do love to read them.

Wednesday, April 4, 2012

Fan Page Timeline Apps - How To Customize Your Tabs

The new Facebook fan pages have a nice banner across the top of the page now.  I really like them.  Besides that, our apps are now displayed under the banner, where they are much more noticable.  Not only that, but they can be rearranged and can also be renamed and the graphics can be replaced. 

There is only one app that cannot be edited or moved in any way, and that is the photos app.  I would like to be able to move it, but for some reason, Facebook thinks that it needs to remain in the first position.  There are a couple of other apps that can be moved, but you can't change the name and you can't change the graphic.  Those are the "likes" and the "notes".  There may be others, but I am not aware of them, as I don't have any other apps on my fan page which cannot be edited like that.

I will explain just how to customize your apps, complete with screen shots.  It is an easy process, and you should have fun getting your fan page set up just how you would like it to be seen by visitors and fans.

Your apps are now displayed under your banner.  You can have up to 12 apps, but only 11 are your choice because the photos app remains in the first spot and cannot be deleted.  There are only 4 that show, and a number next to them tells how many are hidden.  When you click on that number, the apps expand to show the rest of your apps if you have more than four installed.  Go ahead and click that to expand. (see the illustration)

My screen shots and instructions were made while using Internet Explorer 9.  There might be differences in the way you will do it and what you see if you are using another browser, but it should be close to the same.


After you click that number at the end of your apps that are showing, you can see the rest of your apps as well as how many spaces you have left if you would like to add any more apps.


Now you can edit any one that you like.  Hover your mouse over any, except the photos, and you will see a pencil appear for editing. 


Once you click the pencil, you will see your edit options.


You can only swap one position at a time, but keep on swapping until you have them in the order that you want.  Simply click on the app to swap positions with and it is done.

If you would like to rename your app and/or change the graphic on the tab, click on Edit Settings and another box pops up for you to make your changes.


To change the name, just fill in the box and save it.  If you want to change the graphic to a custom tab image, click on change and a new window will open.


Click on the change link in the new window that opens.


Use the box that pops up to choose an image from your computer to upload.  It will replace the image and you will see the image replaced, but there will be no save button in this window.  You will have to leave this window (or browser tab) open and return to the other window that you left open in order to click the okay button to save your new image.


After your new image has uploaded, click on the tab that has your fan page open and click the okay button to save your new image.  After you have saved it, you can close this window.


And that's it.  Your image size that you need is 111 pixels wide x 74 pixels high.  I hope that this has been helpful for you.  I welcome your comments.  Please be sure to come by my fan page and click the like button.  http://www.facebook.com/IndizonaVariety 

If you need somebody to make the graphics for your new app tabs, let me know.  My prices are reasonable.  Have a nice day!!!  Thank you for stopping by.