Monday, June 27, 2011

Motivation for The Ladder of Success

All that stands between you and the top of the ladder is the ladder. Our ladders aren't all in the same place - and they aren't all the same size. It is up to each of us to climb our own ladders though. If we don't climb the ladder, we will never see the top! If your ladder looks too high to climb, remember that you have to climb it one rung at a time and not take a flying leap for the top! When you have a task to do and it seems too big to do, break it down into smaller tasks so you can feel accomplishment as you climb each rung.

The ladder of success is not truly one ladder, but many ladders that we climb with landings or platforms in between. Each task is a ladder in itself. We've all heard that Rome wasn't built in a day, and neither are our lives built in a day. Set reasonable goals for yourself and set deadlines to get those things done. Make a list, prioritize your tasks, and keep your eye on the goal as you climb the rungs on your ladder.

As an online seller, there are many things behind the scenes that I do to serve my buyers. I may have to do extensive research online to find information about an item or many items I am listing. I have to take photos that are well focused and interesting and write a detailed description that gives all of the facts in an interesting manner. I need to find packaging and weigh the item(s) to determine weight for shipping charges and decide if shipping should be included in the price or not. After listing my items on eBay, Bonanza or Addoway, I need to keep up with my Facebook friends and fans, Twitter followers, and run my house. If I look at everything I have to do at once, it is quite overwhelming, and not easy to get motivated to start any of it. I break it down into small tasks and take care of one thing at a time. If I need to work on listings, I close the Facebook and Twitter tabs so they are not popping up with new posts to distract me. For instance, I take photos of many items at once, and then sit down to write descriptions for those items.

Zig Ziglar said, People often say that motivation doesn't last. Well, neither does bathing - that's why we recommend it daily.” It might help every day to remind yourself why you do what you are doing. (in my case, selling online) Think about what it is that you wanted when you first started and decide if your motives are the same now, or if they are the same. Do you do what you do to make money just for the sake of having money? I sincerely doubt it. Are you working toward a goal? What is that goal? Is it a vacation? A house? College education? Putting groceries on the table? Once you know what it is you are working for, you can focus on that to motivate yourself to “just do it”.

Mark Twain once said, “A man who carries a cat by the tail learns something he can learn in no other way.” Since experience is our best teacher, it is best to just start doing whatever it is you are dreaming of doing and you will learn as you go. Your mistakes will teach you what to avoid and what to change. Your failures are not failures, but opportunities to learn. Do you know how WD-40 got its name? WD stands for Water Displacement and the 40 stands for the 40th try. That's right... the formula failed 39 times, but on the 40th try, they got it right! So don't give up, keep going... making little changes each time, until you get it right.

I asked a variety of people to tell me what they do to motivate themselves when they just don't feel like doing anything. I asked young, old, and in-between, both male and female and even though their answers were all different, there were similarities in many of the answers. So when you just don't feel like doing those things that you know need to get done, try some of their methods:
  • tell yourself that it just has to be done and you're the only one that can do it
  • put on some upbeat music
  • shut off the TV and just do it
  • think about the results
  • look past the task and look forward to what you can do when it is done
  • find somebody to be accountable to and have them keep track of your progress for you
  • pray and ask God to motivate you and get you through it
  • just don't do it.. do something that you thoroughly enjoy first and then come back to it with a fresh mind
  • picture the goal
  • break it down in little pieces and get one piece done before moving on to the next one
  • list and prioritize
  • set a deadline
  • go for a power walk early in the morning to get yourself ready for the day

I plan to climb my ladder one rung at a time and see where it takes me! I am trusting The Lord to lean my ladder against the right building and take me to the top of it. I wish you success in finding the top of your ladder too!
In closing, I would like to share this poem by Dr. Seuss:

You have brains in your head.
You have feet in your shoes.
You can steer yourself in any direction you choose.
You're on your own.
And you know what you know.
You are the one who'll decide where to go.
Thank you for reading, and God bless! I hope that I have helped to motivate you in some way today. Your comments are welcome.
Saturday, April 9, 2011

How to Use the Templates I Make for Addoway Listings

I am now selling on addoway and I created my own listing template to use for my addoway listings.  After posting it on Facebook and receiving compliments, I made a listing template for one of my Facebook friends who is also selling on addoway.  I will be making more templates and listing them for sale in my storefront on addoway
Some people have never used a template before and don't know how to use one.  Out of those people, some will choose to figure it out by themselves, while others would like very much to have detailed step-by-step instructions with screen shots.  This tutorial is for all of you who need help to use your template that you buy from me.  I have made my instructions easy to follow for those who need help with the basics, and anyone who just needs a little help can find the portions of help they need.
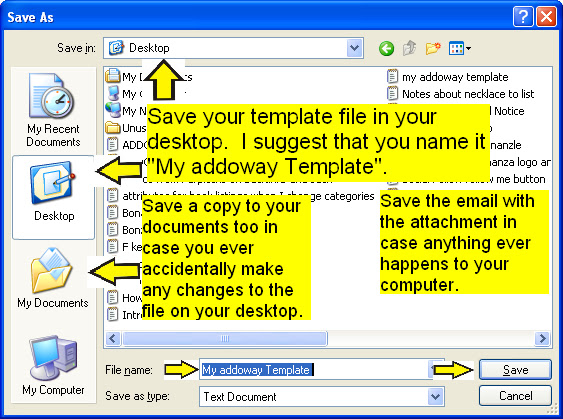
When you buy a listing template from me, I will send the file to you in an email attachment.  The file will be a notepad document and you will need to first save it to your computer.  I suggest that you name it "My Addoway Template" because the code fits into addoway's website, but it might not display correctly on another website without tweaking it a little.  Also, if you have links to your policy pages on Addoway, you don't want to use those links if you use the same template on Bonanza or eBay or any other site.  (I can fix those links for you for an additional fee, of course.)

Saving Your Template To Your Computer

When you save it to your documents folder, you should add "Original" to the file name and possibly "do not make any changes".  (The reason for this will be explained later.)

After you have saved it to your desktop and your documents folder, you will need to save it to your addoway and personalize it with any boilerplate information that you need to add.  (Your storefront policies is referred to as boilerplate.) 

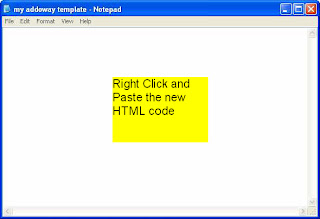
Open your notepad doc on your desktop and minimize it so that it is open and ready for you to use.  Unless you are used to seeing HTML, it will look strange to you, but all is well.  It is the code that makes your template display on a website.

Saving Your Template To Your Addoway

Now sign in to your addoway and click the Sell tab to make a new listing.  You will first need to select a category, just like with any other listing.


Continue to fill in the required information for a new listing.  You will be making new listings from this new listing that you are creating.  So any information that is constant in all of your listings will save you time when you make listings from your saved template.  Some fields will change with each new listing, but it is easy enough to edit.  For this listing, it will be your template, so it will not matter how you fill in the blanks if you don't always sell in the same category.


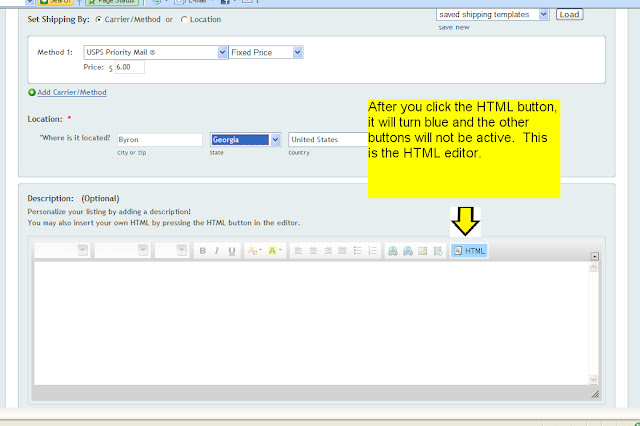
After you fill in the shipping information, you will be ready to put your template into your template listing.  Click on the HTML button in the description editor, as illustrated in the next screen shot. (the HTML button could also be named SOURCE)


Now you are ready for your notepad file that you have open and waiting for you.  Click on it in your task bar so you can see it.  You will need to copy the file from your notepad and paste it into the HTML editor.  If you are not used to copying and pasting, follow the next screen shots.

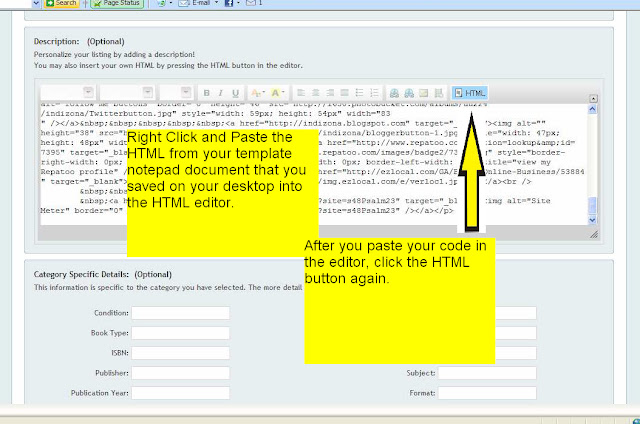
Now that you have copied your file, you need to right click inside the HTML editor and paste your template code in the window.


When you click the HTML button again, you will see your template in the description editor.  This view is also known as the WYSIWYG view, which stands for What You See Is What You Get.  The HTML code tells your browser what to display in the WYSIWYG window.  (the HTML button could also be named SOURCE)

If I made buttons for your template linking to your shipping, return, and payment policies, your template should be ready to save.  If you have any more information to add that ALWAYS REMAINS THE SAME in EVERY LISTING, enter that information in your template now.

If I made boxes for you to enter your policy information, fill those in now.  Make sure that all of the information that you need to have in every listing is put into your template now.

Do NOT add a description because that will always change unless you sell the exact same thing over and over again.


You might not see the borders of your template in the editor, but you will see the entire template when you click the preview ad button.


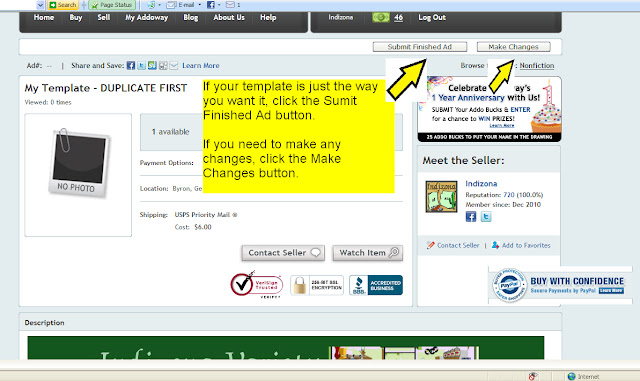
If you have your template set up just the way you want it now, click the submit ad button, if not, click the other one and make your changes.


Once you click the submit finished ad button, it is an active listing.  You don't want it to be active because you don't want it showing in your storefront as an item for sale.  So, immediately go to your ads and deactivate it.


Make A New Listing With Your Template

When you make a new listing, you can click the Duplicate button on your deactivated template listing and it will bring the duplicate up for you to edit and submit a new listing.  This is why you want all of your information that is always the same to be there so you have less editing to do and your main task will be to add a description.

If You Made Any Changes To Your Template, You Will Need To Save Those Changes To Your Computer Too

If you made any changes to your template when you created your template listing on addoway, your HTML is different than it was when I sent the file to you.  Now that your template is saved in your addoway, you will want to save your new HTML into the notepad doc that you saved on your desktop.

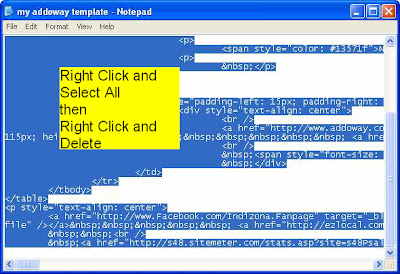
First, open your template that you saved on your desktop and delete all of it.  Keep the file open so you can paste your new code into it.  Now you will need to open the template in your addoway again.
Either click "edit" or "duplicate" on your new template listing that you just created and deactivated.  Click the HTML button to bring up the code again.  Now copy all of the HTML of your edited template.  (the HTML button could also be named SOURCE) 


Paste your new HTML code into your notepad document and save it.  You will be replacing the original, so this is why I told you to mark one as original and save in your documents folder so that if you need to go back to it, you will have it.   After you have saved your new file, you can just click out of your template on addoway by clicking one of the tabs at the top, like "my addoway".

Inserting Your Template Into An Existing Listing

From here I will explain how to insert your new template into an existing listing, whether it is an active listing or deactivated listing does not matter.  Follow these instructions if you are changing from an old template to a new template too. 

You will have to first click the edit button to bring it up and then click the HTML button in the description editor. (the HTML button could also be named SOURCE) 


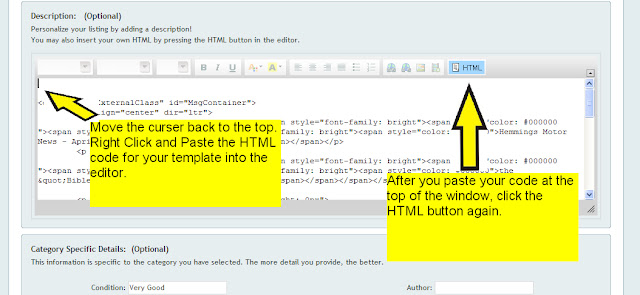
When you have the HTML editor view, place the curser at the very beginning of the code and hit "enter" a couple of times and then place the curser back at the beginning.


Copy your template HTML from your notepad doc on your desktop.  (you should have it open already, but it not, open it now)  With the curser placed at the top left of the HTML editor on addoway, paste your template ABOVE the HTML for the description that is already there.


Click the HTML button again to get the description editor back. Your template will be displayed above your original listing.  (the HTML button could also be named SOURCE)


Scroll down to your description and copy it.  Then scroll back up to the description area of your template and paste it there.


Right click and drag the mouse to highlight what you need to copy, then right click again and click copy.  To paste, you right click and click paste. (then click allow access)


Your original text will paste in the same color it was when you paste it into your template.  You might need to change the font color.  If your font color in your template is black, you can choose black from the dop-down font color.  If I made your font any other color than black, I gave you the color code for it.  Now I will explain how to use that code.

First, right click and drag your mouse over the part that you need to change the color and click on the font color button.

Click the more colors option so that you can enter the code for the color that you need.  Enter your code in the box and click OK.

Your description should now have the right font color for you.  If it does not, then there is a problem in the HTML of your original listing.  You might find help for that in my previous post about editing HTML code. If you cannot find help there, I will do what I can to help you when you are using a template that you purchased from me.

Don't forget to scroll back down to the original description and delete all of it before you click the Preview Ad button.  When you preview your ad, check for anything that you need to change, just like with any other listing and if it's good to go, click the Submit Finished Ad button and move on to your next listing.

I hope this has been a helpful post, if you use one of my templates, or one from somebody else.  Your comments are welcome, and I will enjoy hearing feedback from you.

Monday, January 10, 2011

Using The Batch Editor on Bonanza to Change HTML

I have been a member on Bonanza.com (formerly Bonanzle.com) for almost a year now.  I like it more all the time, especially when I discover how to do something that makes things easier!
When I had an eBay store, I named it Indizona's Variety Mall and this storefront is in my template that I use on eBay for all of my listings.

When I came to Bonanza, I needed to have an avatar and a banner for my new booth.  I wanted to use this same storefront, but could not make it work because you can't see it well enough when it is small enough to fit in the space for the banner or the avatar.  Therefore, I had to come up with something new.  


Seeing how that I have a booth on Bonanza instead of a store, Variety Mall didn't seem to fit any more.  I decided to just simply name it "Indizona's Booth".  After making my avatar and booth banner, I set out to get a listing template made.  I made my graphics and then paid VirtualDesigns on Bonanza to put it together for me.  
 

I felt the need to tie the banner and avatar together into this welcome badge in my listings.

I have been thinking on my name, Indizona's Booth, for some time now and comparing it to my name I was using on eBay, Indizona's Variety Mall.  Knowing that I can't make my storefront image work, I still don't want to use the word "mall" in my name.  So, I decided to change the name from Indizona's Booth to Indizona Variety.  Changing the booth banner was easy.  One click, one upload, done.  But, changing my welcome badge in my listing template to this one was not going to be an easy task.  I was looking at having to edit every listing, one at a time to make the change and then I thought to check out the batch editor to see if I could use it to get it done.
 
I have known that Bonanza has a batch editor, but I had only used it a few times to do simple things like put items in reserve, make them active again, add item traits and insurance to the shipping.  Now I needed a way to replace the HTML for my welcome badge to change all of my listings at once instead of one at a time.  So I went to the batch editor to see if it was possible.  I discovered that I can replace the HTML in my listings too!! WooHoo!!!

First, I opened 2 browser windows to work from.  One window had the batch editor open and the other window had the edit items page open.  From my edit items page, I chose the first listing and clicked edit and brought up the HTML editor.  The screen shot shows my new image because I have already made the change.  I will now explain how.

Click on the image button at the top of the editing box.  I circled it in the screen shot for you.      

A little box pops up as seen in the next screen shot.  Copy the web address for the image that you need to change from the source line in the box.  I circled the source line for you.


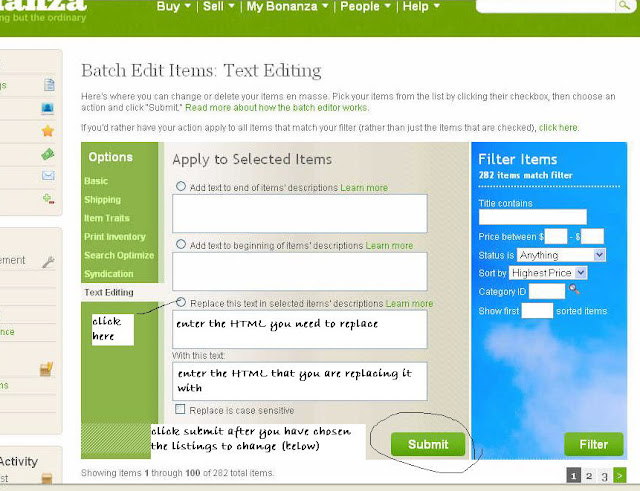
On the batch editor page, click on Text Editing from the list of options on the left.  Click the circle where it says "Replace this text in selected items' descriptions" and paste the web address that you copied in the top box.  Next, get the web address for your new image that you are going to put in place of the old image and paste it in the next box where it says "With this text:".  If you are using Photobucket to host your images, it gives you several options for linking to the image.  You need the one that says it is a direct link.
After you have selected the listings that you are going to change, click the submit button.  I did one first to be sure that I did it correctly and that it would work.  When I saw that it worked, I did the rest of my listings.


I then used the top box, "Add text to end of items' descriptions" to put the HTML code in for my Facebook and Twitter buttons that I added to the end of all of my listings.

Do you want to change the font in all of your listings at once?  Get the HTML for it and use the batch editor.  Change the color of the font?  Get the HTML and use the batch editor.  From your edit item window, highlight a word or two and click the source button.


After you click the view/edit source button, pointed out for you in the screen shot just above, it will bring up the source editor for you and the words that you highlighted will be highlighted, along with the HTML code for the font and the font color and the font size.  The HTML for the font is written like this: FONT-FAMILY: Freehand591 BT  and the HTML for the font color looks like this: 
COLOR: rgb(238,204,101).  
The font size is written like this: FONT-SIZE: 14pt and so on.  See the next screen shots.

When changing the font you simply replace the name of the font you don't want with the name of the font you do want.  In my illustration, the font name is Freehand591 BT and that is the only thing you need to replace with say, Times New Roman.  Leave the FONT-FAMILY:  alone and just change the name of the font.  In order to change the color, you change the rgb and what's in the parenthesis and leave the command,COLOR: alone.  To get the code for your new color, change the color in your item editor and bring up the source editor to see the code for your new color.

So, if your font is Arial and you want it to be Verdana, you would put FONT-FAMILY: Arial in the "Replace this text" box in the batch editor and put FONT-FAMILY: Verdana in the "with this text" box in the batch editor.  Choose the listings that need to be changed and click submit.


I am so glad to know that when I need to change one piece of my template I can just find the HTML for that which I need to change and put in the HTML to replace the old with. It makes things so much easier and I can choose to make the changes in every listing, or only ones I have checked. How cool is that?  I am also glad that Bonanza makes it easy so that I don't have to know a whole lot about HTML in order to find what I need to replace.  I hope that you will find it as easy to work with.

Please be sure to visit me at Indizona Variety.